

by Kelly Anderson, on Feb 28, 2020 11:25:21 AM
So, You Want a Solar Installation. How Long Until You Start Saving?
Maybe the thought recently crossed your mind for the first time. Or perhaps you’ve been mulling it over for several years. Regardless, are you contemplating solar panels for your Decatur, IL home? The process can be mysterious, and it’s often hard to know where to start. That’s why we’ve started this blog on solar power—to share what we know about the industry. We have discussed the savings and tax credit incentives that solar-powered households enjoy. But how long will it be until you can reap the benefits of solar?
For a detailed step-by-step breakdown of the solar installation process, we’ll discuss in three parts precisely what you can expect. Continue reading to learn how we’ll start with your installation.
SEE ALSO: How Solar Panels Can Help Your Tax Season
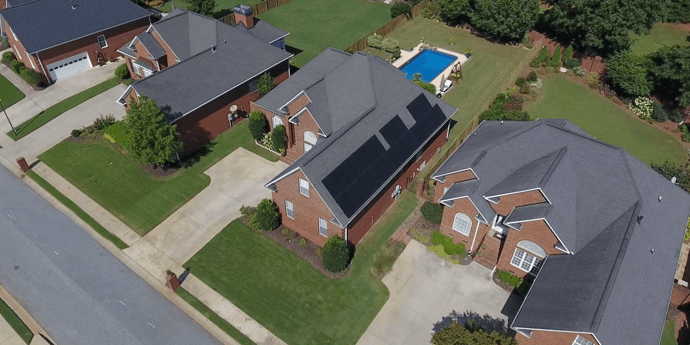
Step One: Shading Analysis
Before anything else, we need to ensure that your rooftop is suited for solar panels. Our goal is to take you one hundred percent solar so that all of your utility costs are offset by the panels. However, not every house can qualify. Whether it’s due to large trees, shadows from other buildings, or simply not enough functional space on your roof, your system may not produce enough sunlight to be worthwhile. The ideal house is south facing for ultimate sunshine. Using satellite technology, we’ll determine through a shading analysis how much sunlight your home receives in a day, and will provide an estimate as to how much you can save.
Step Two: Check Roof’s Structure
Once we determine that your panels will produce enough of your energy to save you money, a member of our team will come to your residence to ensure that structurally everything will work on your rooftop. We’ll complete a pre-installation check so that we can adequately flush mount your panels. We check the depth of the rafters and will measure the roof’s slope. If your rooftop appears structurally sound without signs of alterations or deteriorations, we can move on to the next step.
Step Three: Look at Electrical System
Next, we’ll check on your electrical system’s panel and confirm that there aren’t any alterations needed. Your panels will connect to an inverter and then to the AC fuse box in your house. Our team will have a look at your system prior to installing to be sure everything will connect and function accurately and safely.
Physically everything looks ready for an installation, and your rooftop is proven to produce enough sunlight. So, what happens next? Stay tuned for part two of our step-by-step series!
When you decided to go solar, our sales representative and project manager will be there for you throughout the entire process. To get started on your home’s system, contact Summit Solar here.
